

Baby Hoodie Blocked Pattern by HiLLjO
If you would like to purchase the full pattern with written crochet instructions for each piece, please visit my etsy store! Thank you.
Otherwise, feel free to use the pattern below to make your own fabric, fleece, knit or crochet hoodie of your choice! Enjoy!
Otherwise, feel free to use the pattern below to make your own fabric, fleece, knit or crochet hoodie of your choice! Enjoy!

For Crochet: Gauge – G6 Hook with Worsted Weight Yarn or other hook necessary to maintain Gauge
4dc/in.
3 rows dc/in.
Measurements needed for custom garment sizing:
Head Circumference and Height
Belly/Chest Circumference
Neck to Back Length
Head: 16 in. around; 7 ½ in. tall
Chest/Belly: 17 to 19 in. around
Back Length: about 9 in.
Sleeves for babies under 1 year old usually measure 9 to 10 in. long. Fist Circumference is about 5 ½ in.
To get measurements for all blocked pieces shown below (except adult sleeve), calculate the following:
Width of Front pieces: Divide chest/belly measurement by 4 (ex. 6-9 mo. size Front pieces are 4 ½ in.).
Width of Back piece: Divide chest/belly measurement in half (ex. 6-9 mo. size Back piece is 9 in. wide).
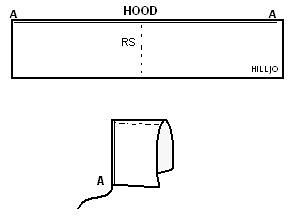
Length of Hood: equal to height of head multiplied by 2, plus 2 in. (ex. 6-9 mo. size Hood is 16 in. long).
Width of Hood: equal to ¾ the measurement of the head’s circumference, divided in half (ex. 6-9 mo. size Hood is 6” wide).
Width of Sleeve on “Arm Pit” side: equal to length of Front/Back pieces (ex. 6-9 mo. size Sleeve is 9 in. wide on “arm pit” side).
Length of Sleeve along seam: For babies 6 mo. to 1 year, this is 9 to 10 in. on average.
Width of Sleeve for Wrist Opening: 5 ½ in. across on average.
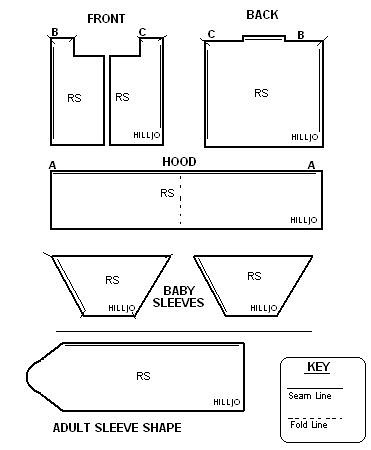
Blocked Pieces – General Shapes (not to scale)
To assemble you will need:
Both Front pieces, 1 Back piece, 2 Sleeves and 1 Hood piece
Yarn needle
Matching Yarn
Scissors
Separating- or Coil-style zipper which matches the length of your Front opening
Yarn needle
Matching Yarn
Scissors
Separating- or Coil-style zipper which matches the length of your Front opening
Front/Back Pieces
Arrange Front and Back pieces as shown in diagram.
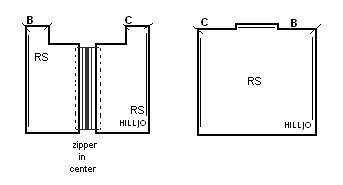
Align and pin zipper in the center of the two front pieces. Make sure zipper tape is on the “inside” of the Front pieces and pin through the front. Sew each side of zipper tape to each Front side of hoodie with needle and thread. Remove pins.
With RS facing, line up shoulder corners B & C on Front and Back, sew B to B and C to C along seam lines with yarn needle and yarn. Weave in ends and set aside.
Sleeves
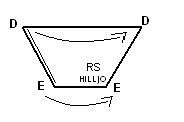
Fold Sleeve piece in half (D to D; E to E) and sew along length from E to D with yarn and yarn needle. Weave in ends and leave long tail of yarn. Turn inside out to show RS.
Repeat for other Sleeve.
To attach sleeves, first place markers in each Sleeve piece at top shoulder and bottom “arm pit” as shown.

Place markers on Front/Back piece at top shoulders. Match each Sleeve’s shoulders with the Front/Back piece shoulders. Place markers in Front/Back piece where “arm pit” markers line up (about halfway down length of Front/Back piece).
Arrange pieces as follows:
Lay Front piece RS up. Lay Sleeves with RS out with shoulder and “arm pit” markers lining up to outside seam with wrists facing in toward zipper. Lay Back piece WS up on top. Pile should appear as below (Sleeves shown as though Back piece were “see-through” in dashed lines):

Sew each Sleeve to Front/Back piece making sure to only go through the sleeve and Front OR Back layer so as not to sew the sleeve shut.
Fold the Back piece in half to find top-center stitch and place marker as shown.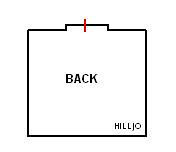
Take hood piece and with right sides facing, fold A to A and sew along seam with yarn needle and yarn. Turn out so RS faces out and seam is hidden inside hood.
Weave in ends and leave a long tail of yarn. Set aside.
With RS of both Hood and Back pieces facing, line this marker up with the center seam sewn down back of hood. Evenly sew hood to back piece (and down onto Front piece’s shoulder areas) with yarn needle and yarn.

Please do not use all or portions of this pattern in any other pubication without linking to this site and giving me credit for my work. Please see the full license deed for this pattern before distributing/sharing. Thank you!
 Stumble it!

3 comments:
Thank you for such an adorable FREE hoodie pattern. I do a lot of crocheting for humanitarian purposes and this is going to be the perfect pattern. I plan to use it A LOT! Thanks again.
Bev
www.oneyarnafteranother.com
@Beverooni, thank you! That is so great to hear. Have fun!
Wow, great instructions! I've never learned how to crochet, but maybe someday I will. Otherwise, I'll just buy all of my cute crocheted baby items from your shop. :)
Post a Comment