Search Favorite Wedding Blogs
Search My Blog
07 June 2011
Bunny Napkins
02 June 2011
Big Mo' is Flooding, but it's all good!
Although our specific venue location is undisclosed for another 8 days(!) I have shared that it is on the Missouri River. Well, folks when all the snow melts, where do you think it goes? In the river!
![]() |
| Photo by Josh Korth for KVNO |
![]() |
| Photo by Josh Korth for KVNO |
Keep Calm and Marry On, right?!
28 April 2011
DIY Tutorial #6 - Framed Chalkboard Signs
I am in love with the chalkboard trend for weddings.
They're cute, customizable and I think they're becoming increasingly easy to find. Save-On-Crafts has a bunch but beware their shipping charge... yikes!
I went the DIY route on this because I can't justify paying more for shipping than the total of my supplies!
What I started with:
1 Foam Brush
2 Rustic 5x7 picture frames (with a hanger on the back)
A hot glue gun w/ glue sticks
1 (4) yard spool of non-wired ribbon in a width >1/4"
Paper to protect your work surface
Prep your frames by removing the cardboard inserts(don't throw them away!) and the glass carefully. I removed the easel-back but it was stupid-hard. If you leave it on, you can use the frame after the wedding possibly.
Lay out your protection paper and lay out 2 of the cardboard inserts from the frames. Paint each one in a thin coat of paint on each one in ONE direction and let dry. After they dry, repeat another thin coat of paint and let that dry as well.
Plug in your hot glue gun and glue one painted cardboard insert to the plain one so it's thicker.
Position your double-layer cardboard onto the back of the frame closure and glue it into place.
Once it has cooled and is secure, glue the inside of the frame edge and close the frame closure, applying pressure to seal it shut.
Flip them over and check out your handiwork.
To string them up, cut a length of 2 yds and fold the edge in half, then pull through the hanger loop. Make a double-knot at the height you'd like your bow and then make a bowtie.
Let your paint cure for 24 hours before prepping it for chalk. Once it has been a FULL 24 hours coat the entire surface with a sideways piece of chalk, wipe clean and then it is officially a chalkboard.
Rustic-Fabulous!!!
31 March 2011
Mason Jar Centerpieces
My mother in law, Donna went with me on my first wedding-related DIY shopping trip back in August/September. We went to Hobby Lobby because I was so overwhelmed by where to start planning that I couldn't come up with anything! SO not like me (I'm lucky my mom and my future second mom are both crafty)!
We were focusing on table decorations first. I knew I didn't want flowers on the table necessarily, nor anything else that impedes conversation due to size.
Luckily Donna asked the Million Dollar Question: "What do you like?"
I answered simply, "Mason Jars."
"Let's do jar centerpieces then."
"Okay!"
They're short enough to talk over, easy to find and afford, and you can customize the bizingo out of them. How would we choose to customize them, though?
Donna said she had experience glass painting so we went to the book section and found a book on hand painted glasses.
Over the last 6 months Donna has bought everything to make the centerpieces and ended up painting a case of Mason jars+ and also painting tiny sunflowers on a truckload of blue pebbles.
I can't wait to see how amazing they all look together on the tables!
02 March 2011
100 Days to Go! WOW!
| Bunny Wedding bluedogrose @storybird.com |
So onto the rushing DIY tide, everyone. It's going to be appearing so frequently you won't know what to do.
For today's DIY I want to share with you my plans for it first. At the venue, we are having a guest book table (duh) set up with our matted photo, a centerpiece, our big potted Saguaro and a couple of sock bunnies. That's right not sock monkeys, sock bunnies.
You see, I make sock monkeys and sell them on etsy and Shawn & I have our own; but for our bunny-themed wedding we need some sock bunnies, mmk? I don't share a pattern for my monkeys because of two reasons: 1) I make them different each time and 2) I share a lot, but some things are proprietary to even the HiLLjO.
There are a ton of free patterns out there like this one that work wonderfully.
For Shawn's bunny, I stuffed and sewed bunny feet instead of regular feet and I made long ears. I also pre-sewed the bunny profile before stuffing the main body sock. Here's a teaser of him without his eyes and outfit.
01 March 2011
Sheet Music Charger Plates from Celebrations at Home
For the reception, we're just keeping it all very simple. Buffet, cupcakes & donuts, and the linens & china the venue is letting us use. I never thought of charger plates. To be honest, I had to look them up to be sure I understood what they were. I also looked them up to see how much they were.
Yikes.
The answer? Simplify and awesome-ify. Especially if you like music, you'l, love what I found at Celebrations at Home.
Go see what Chris & the other ladies have goin' on at Celebrations at Home.
06 January 2011
Venue Love
![]() |
| This is the window behind where the head table goes. The window faces East so no one will be blinded at sunset during dinner or dancing!!! |
![]() |
| My FMIL hand painted 17 of these beauties for me to go on the tables |
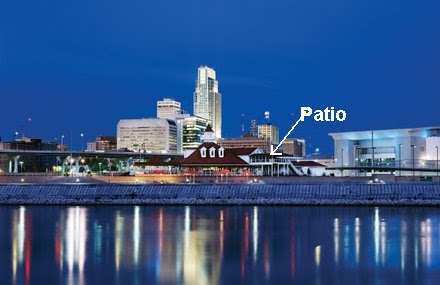
The corner there on the right will be where we're standing and the chairs will be placed in triangle-shaped sections on either side of the aisle. It can accomodate 75 chairs right now as it is. The patio ceiling has white lights strung across it so it will be beautiful as the night goes on.
Love & Welcome All
| Thank you for coming by to read my experiences as a wife and what came before it, as well. My husband Shawn and I were married June 10, 2011 in Omaha, NE! I enjoy sharing my stories and hearing other people's stories so please feel free to share any in the comments (especially dress stories!). I LOVE comments! |


Stumble it!